Priming
section-9317a38
We always recommend full priming of the unit before operation and after servicing, even though some systems have safe priming capabilities.
When the system contains air and the filters and input pipe work are not completely full of fuel, the filters will need to be bled of air and system primed. The system does not automatically purge air, so it is the engineer’s responsibility to do so as described in later sections.

The external pipe work will dictate how your system priming should be carried out, however the following 3 steps are important.
GREY FILTER
The Grey Filter should be topped up with fuel to the brim.

BLUE FILTER
The Blue Filter should be topped up with fuel to cover the output pipe.

ALL PIPEWORK IS FULL OF FUEL
Ensure the entire input pipe work is full of fuel and there are no air pockets.

section-09c1016
Two possible priming methods include:
Priming Method 1
If possible, a simple way to achieve the above priming procedure during machine installation is to connect the input pipe to the tank, but leave the output pipe work disconnected. Use a manual or electronic priming pump to pull a vacuum on the output of the system, and assuming the only ball valve open is the isolating one on the input side of the system, this should draw fuel from the tank, through the input pipe work and into the system. When fuel starts to emerge from the priming pump, switch it off and close all ball valves. The unit is now fully primed and the output pipe work can be attached.
Priming Method 2
If a priming tee has been installed at the highest point then an alternative priming method is to close the output isolating ball valve, and leave the input isolating ball valve open.
Now pour fuel into the priming tee. With the correct setup, this should start to fill the system with fuel. Open the air-bleed valve on the top of the blue coalescing filter, when fuel emerges, close it again, but keep filling up at the priming tee until all the air has been removed.
Regardless of the method chosen, we recommend:
- Before starting your system, the isolating ball valves before and after your system are closed.
- The internal service valve is closed as well.
- Carefully open the lid of both the grey and blue filter; both should be full of fuel.
- If they are not completely full, please top them up at this point.
- Re-attach the lid.
- Re-open the central service valve.
- Re-open the isolating ball valves before trying the system.
NOTE: A loud noise from within the system, or a rapid increase in temperature at the pump head are indications of a lack of fuel flow. In either case, please stop the system immediately to avoid damage, and repeat the priming procedure.
If you have the optional flow sensor attached, the system will tell you. If you do not have the optional sensor, please refer to the “User area and password system” section of this manual to find out how to set up the system to achieve basic fuel flow sensing.
- Ensure power is switched off to the system.
- Close the isolating valve on the output side of the system (above left).
- Open the isolating valve on the input side of the system (above right).
- Open the lid of the grey filter and the air bleed on the top of the blue filter.
- Fill the fuel polishing system and input pipe work (up to the non-return valve) with fuel. The blue filter will not completely fill, however that is not an issue; the pump, grey filter and all input pipe work however should be full.
- Replace and tighten the grey filter lid and close the air bleed on the blue filter.
- Re-apply power to the system.
- Keep one hand on the closed isolation valve on the output side.
- Start the system in manual mode.
- Immediately and slowly, open the isolation valve on the output side while the pump is running. This ensures venting and pressure build-up during start up.
CAUTION: The discharge isolating valve must be opened immediately after starting the system. Otherwise the pump head may be damaged.
NOTE: If it is difficult for the pump to build up pressure, it may be necessary to repeat steps 1 to 10.
Environmental note
If your system is to be installed and operated in corrosive environments, for example near to the coast, or in extreme weather conditions, we recommend regular checking and treatment of all metal parts. Although stainless steel and treated steel have been used in the constriction of your system, water and corrosive elements can case contamination which may in some circumstances damage the surface of the system.
To avoid this, we recommend regular periodic inspection of the system, for example a monthly check; although the frequency may need to be altered depending on the environment experienced. We also recommend protecting all metal surfaces with a suitable degreaser or water repellent protective oil such as WD40 or NanoShell metal, regular repeated treatment may be required to maintain the pristine condition your unit was supplied in.
section-9a8c42a
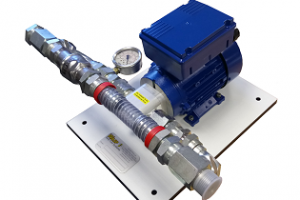
THE LONG TERM SOLUTION
WASP PFS Ltd have created the ideal solution for easy automatic or manual priming. These priming units can be used as an add-on to the W-PFS or WB Fuel Polishing Range or as a stand alone priming solution.
section-d17cb13
section-3ae687f
Get a Quote
Use this form to get a competitive quote!
How Does It Work?
Learn more about WASP Fuel Polishing Systems
Which Fuel Polishing System?
Try our interactive product selector